Ticket statuses are how you keep track of a job that isn't finished after the tech leaves — waiting on a part, waiting on the customer, a return visit to book. The service itself can be marked Complete while its ticket stays open until someone in the office resolves it. You set up the list once in Settings (five minutes), then your team picks a status on any service and filters the Services list to see what's still outstanding.
Watch: the Statuses chapter of the tech-app training (starts at 3:36, about a minute) — service status, ticket status and items for next time, from the tech's side and the office's.
Service status vs. ticket status
They answer different questions, and a service has both.
| Service status | Ticket status | |
|---|---|---|
| Answers | Did the tech finish this visit? | Is there anything still to do about this job? |
| Set by | The tech, at the end of the service report (required). | Anyone, from the service in the office. Optional. |
| Defaults | Complete, Follow Up with Customer, Need to Return (locked; you can add more). | Open, Action Required, Waiting on Parts, Waiting on Customer, Return Scheduled, Resolved (all editable). |
| Lives in | Settings → Fields → Service statuses | Settings → Fields → Ticket statuses |
Customize your ticket statuses
- Click Settings at the bottom of the left-hand menu, then Fields under Configuration.
- Click the Ticket statuses tab at the top.
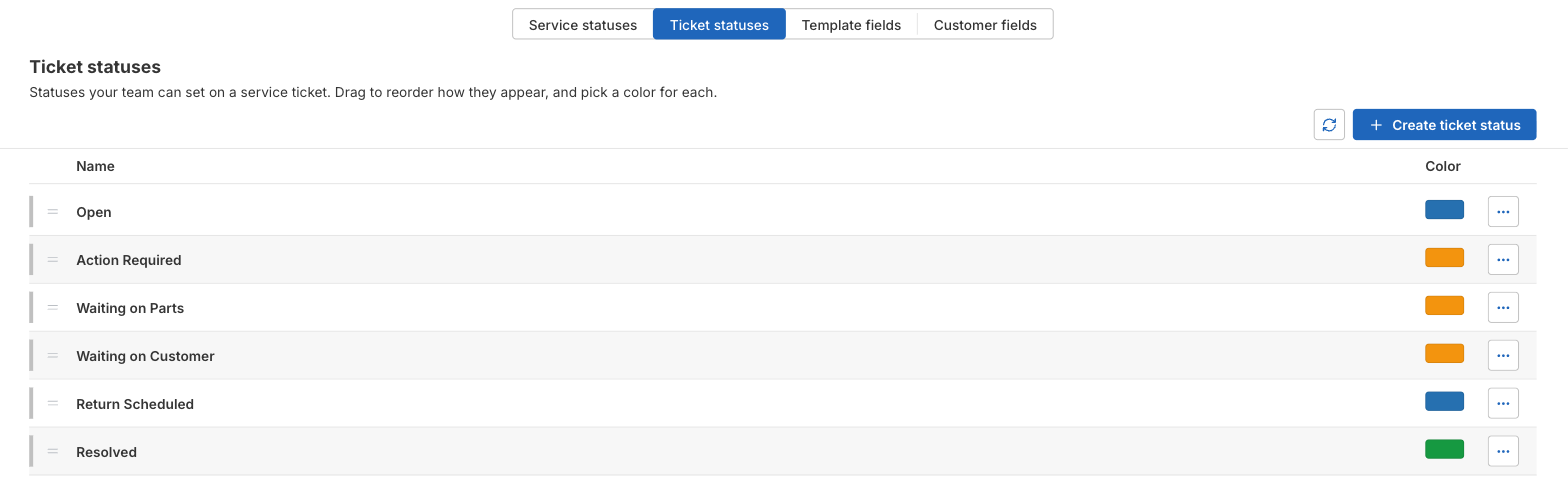
Every row is yours to change. From here you can:
- Add a status — click Create ticket status, type a name (3–60 characters), pick a color, click Create. The color is what shows on the ticket badge on the service, so use it to mean something: orange for "waiting," green for "done," red for "needs attention."
- Rename or recolor — click the ··· menu on the row, then Edit.
- Reorder — drag a row by the handle on its left. The order here is the order your team sees in the dropdown, so put the ones you use most at the top.
- Delete — ··· → Delete. POM asks which status to move any services that are still using the one you're deleting, so nothing is left without a status.
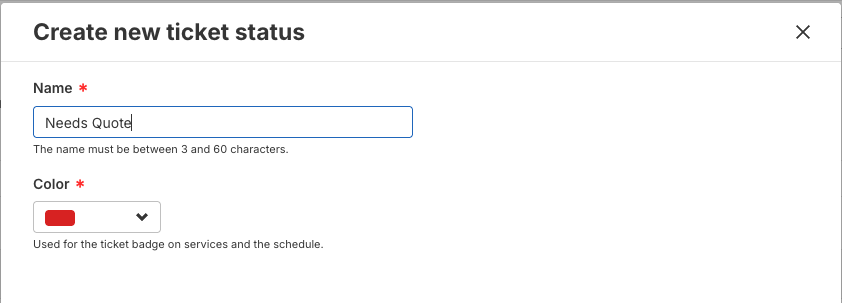
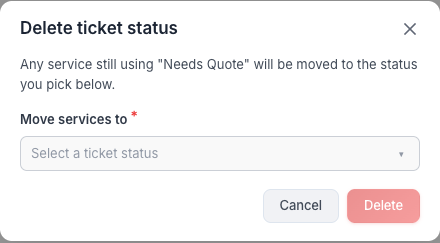
Changes apply straight away; there's no Save button on this page.
A set that works for most pool companies
The defaults cover the common cases. Companies that do a lot of repairs usually add one or two of these:
- Needs Quote — the tech found something; the office has to price it before anything else happens.
- Parts Ordered — more specific than Waiting on Parts; the order's in, you're waiting on delivery.
- Warranty Claim — waiting on the manufacturer.
Keep the list short. If your team has to think about which of two similar statuses to pick, merge them.
Set a ticket status on a service
- Open Services in the left-hand menu and click the service.
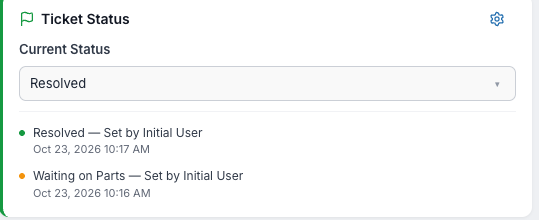
- On the right, in the Ticket Status panel, choose a status from the Current Status dropdown.
That's it — it saves immediately. The badge in the header next to TICKET changes to the status and its color, and the panel keeps a history of every change with who made it and when.
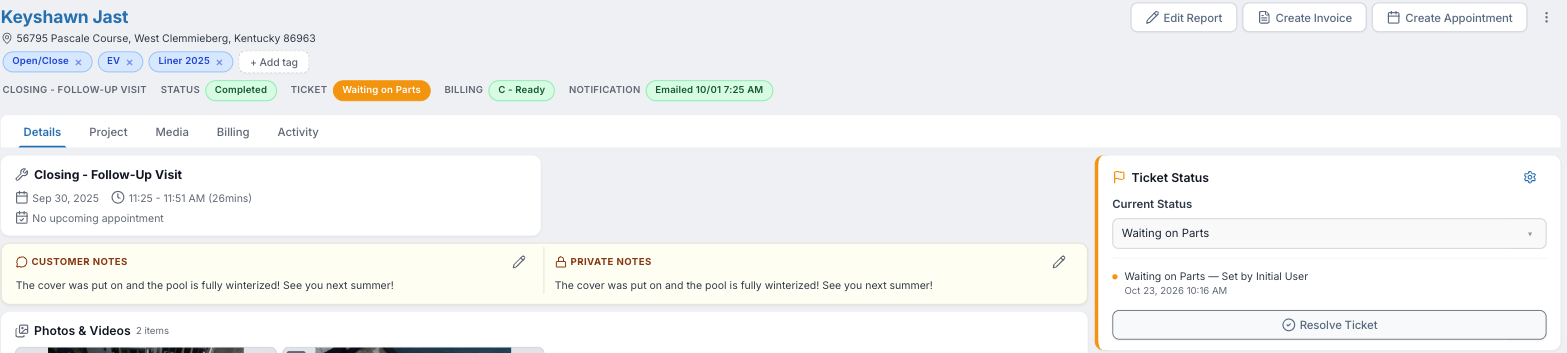
- The gear icon in the panel's corner jumps straight to the Ticket statuses settings page.
- A service with no ticket shows No Ticket in the header. You don't have to set a ticket status on every service — only on the ones with something outstanding.
Resolve a ticket
When the part's installed or the customer's called back, open the service and click Resolve Ticket in the Ticket Status panel. That sets the status to Resolved (green) and adds a line to the history. The button disappears while the ticket is resolved; if it needs to be reopened, pick any other status from the dropdown.
Show ticket status as a column on the Services list
Out of the box the Services list doesn't show ticket status — you'd have to open each service. Add the column once and every row shows its colored badge:
- Open Services in the left-hand menu.
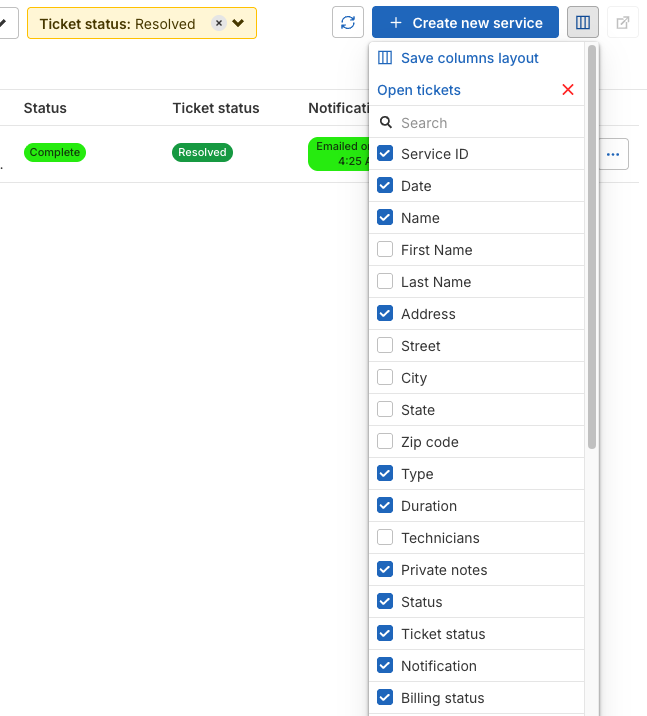
- Click the columns button — the small grid icon at the far right of the toolbar, just past Create new service.
- In the list that drops down, tick Ticket status (it sits between Status and Notification). The column appears immediately; untick anything you don't need to make room.
- Optional: click Save columns layout at the top of the same list, give it a name like "Open tickets," and click Save. The name then appears at the top of the columns list so you can switch back to that layout with one click; the red × next to it deletes the layout.
- Click anywhere outside the list to close it.

Find everything that's still open
This is the part that makes ticket statuses worth using. On the Services list:
- Click the Ticket status filter in the toolbar and tick the statuses you want to see (for example, everything except Resolved). The filter turns yellow to show it's active, and Clear filters appears next to it.
- Widen the date range at the top if you want tickets from earlier months — the list defaults to the current period.
- With the Ticket status column turned on (above), you can see at a glance which status each one is in.
A Monday-morning habit that works: filter to Waiting on Parts and Waiting on Customer, and chase each one. Then filter to Return Scheduled and check that every one actually has an upcoming appointment.
Watch: Return Visits & Rescheduling (1 min) — how a Need to Return service becomes a scheduled follow-up, using the Services list as your to-do list.
Common questions
Does the customer see the ticket status?
No. It's internal. The customer only sees the service report you send them.
Does resolving a ticket change the service status or billing?
No. Service status, ticket status and billing status are separate. A service can be Complete, invoiced, and still have an open ticket.
What happens to services when I delete a status?
POM moves them to whichever status you pick in the delete dialog. Their history keeps the old entries.
Still need a hand? Email help@poolofficemanager.com or call 614-710-0074.