▶ Watch: Add your first customer (1 min 12 s)
Your first customer is the moment Pool Office Manager starts working for you. Everything else in POM (appointments, service reports, invoices) hangs off a customer record, so this is the first thing to do in a new account.
There are two ways to get customers in. Pick the one that fits you:
| If you… | Do this | Time |
|---|---|---|
| Use QuickBooks Online | Connect it first. Your customers sync in automatically. See Connect QuickBooks Online below. | 5 minutes |
| Have a spreadsheet or another software | Email the file to files@poolofficemanager.com (questions go to help@poolofficemanager.com) and we import it for free, usually within 1 business day. Add one customer by hand while you wait so you can see how it works. | 2 minutes to send |
| Are starting from scratch, or want to see how it works | Add a customer by hand. That is the rest of this article. | 4 minutes |
Add a customer by hand
1. Open the Create Customer form
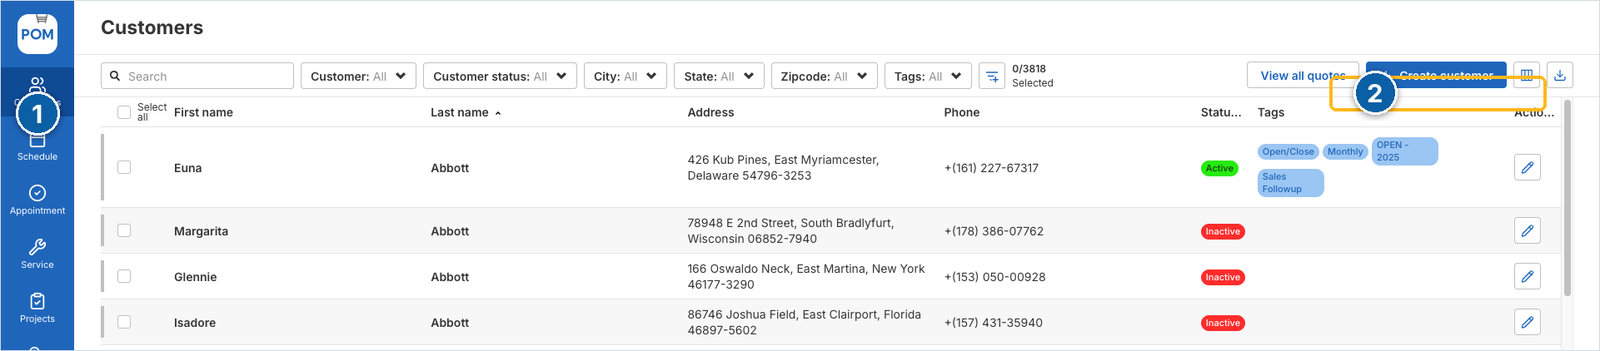
In the left menu click Customers (1), then Create customer (2) at the top right.
2. Enter the contact information
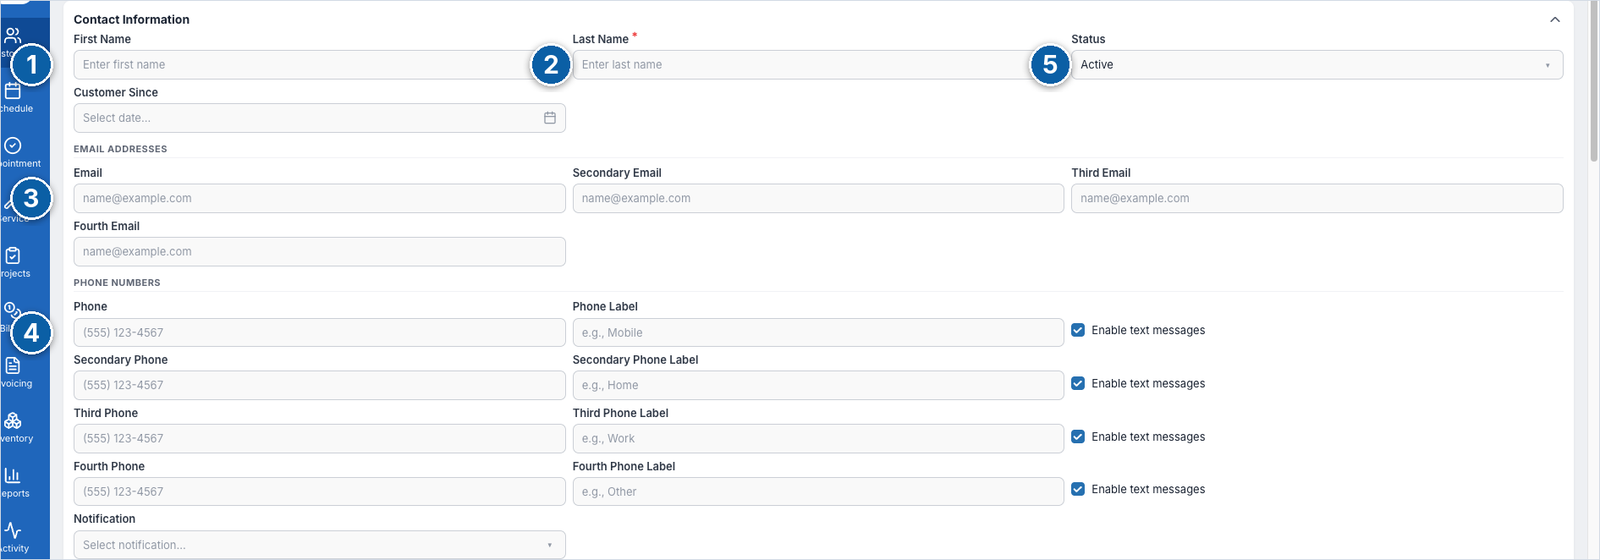
- First Name (optional; use the company name in Last Name for a commercial account)
- Last Name (required)
- Email. Service reports and invoices go here. You can add up to four.
- Phone, with a label such as Mobile or Home. Leave Enable text messages checked if the customer is fine with texts.
- Status stays Active for a customer you service now. Use Inactive for a customer you have paused.
You can add a Customer Since date and a Notification preference now or later.
3. Type the service address and pick the match
Start typing the street address in Address (1). POM suggests matches as you type; click the right one (2). City, state, zip, latitude and longitude fill in for you.

4. Check the map and set the service details
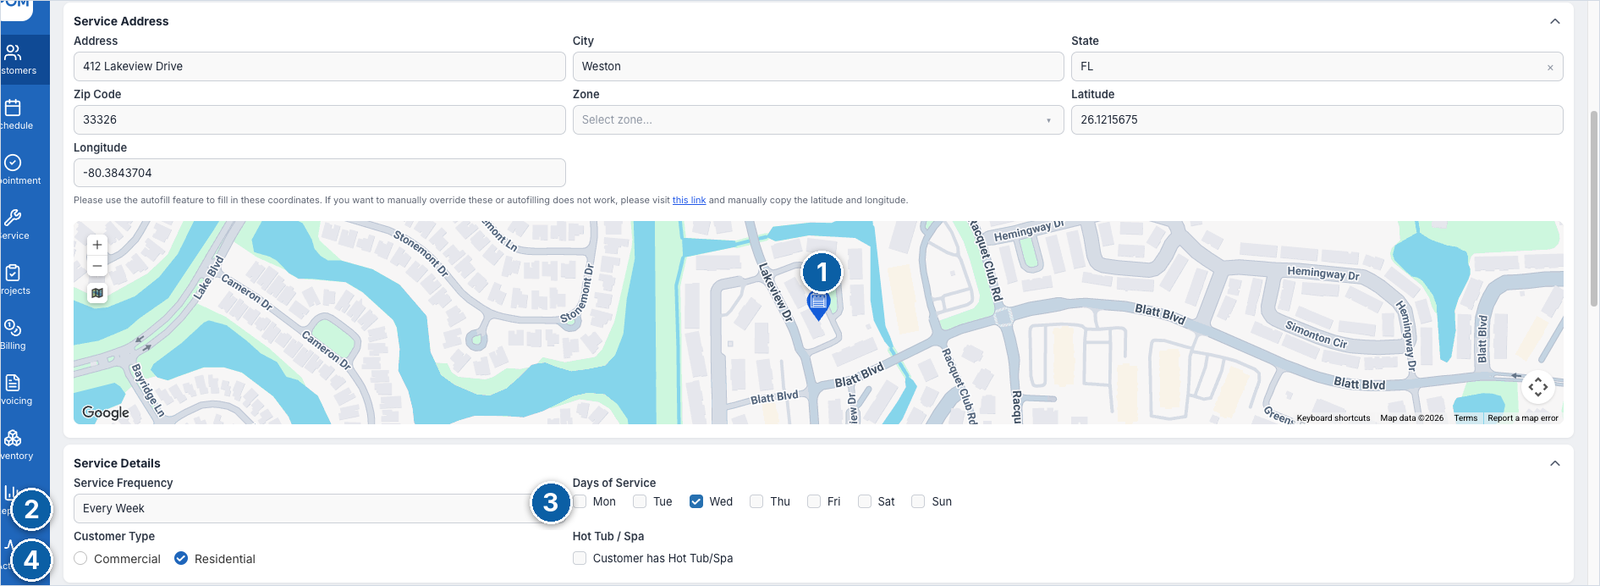
- The pin (1) shows where POM placed the customer. This pin is what the Schedule map view and route optimization use, so if it is wrong, fix the address before you go on.
- Service Frequency (2): Every Week, Every Other Week, Every Fourth Week, Every Six Months, or Yearly.
- Days of Service (3): tick the day or days you normally visit.
- Customer Type (4): Residential or Commercial. Tick Customer has Hot Tub/Spa if there is one; you will add it as a second body of water in a moment.
Frequency and days are defaults that pre-fill new appointments for this customer. You can still change any single appointment.
5. Billing, custom pricing and notes (optional now)
Below the service details you will find:
- Billing: QuickBooks ID, billing name, billing contact and billing address. Leave Same as service address checked unless the bills go somewhere else.
- Custom Pricing: override your standard price per service type for this customer only. Blank means the default price applies.
- Notes: profile notes (what the office needs to know) and sales notes.
You can come back to all of these later from the customer’s profile.
6. Save
Click Save Changes at the bottom right.

POM opens the new customer’s profile. This is the moment your account is activated: you have a real customer, and everything from here on (appointments, service reports, invoices) attaches to this record.
Add the pool (body of water)
Every customer gets one body of water called Pool automatically. Give it real details now. The volume in gallons drives the chemical dosing math your techs see in the field, so this is worth thirty seconds.
On the profile, scroll to Bodies of Water and click Edit (1).

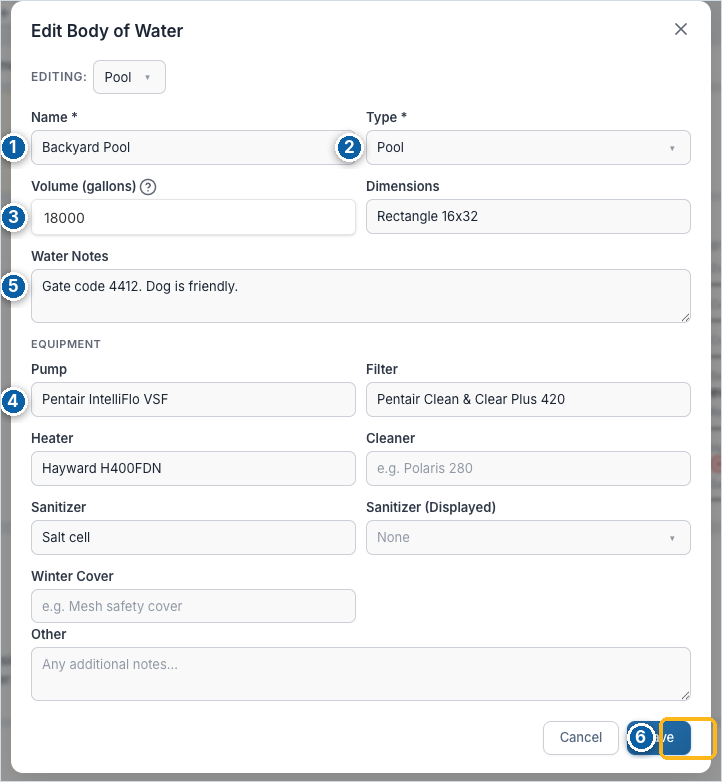
- Name: something the tech will recognize, for example Backyard Pool or Front Spa.
- Type: Pool, Hot Tub, Spa or Other.
- Volume (gallons): the number that powers dosing. If you do not know it, use length × width × average depth × 7.5 for a rectangle.
- Equipment: pump, filter, heater, cleaner, sanitizer, winter cover. Free text; type what is on the pad.
- Water Notes: gate codes, dogs, chemical preferences. Techs see this on every visit.
- Save.
To add a spa or a second pool, click + Add in the Bodies of Water section and repeat.
The finished profile
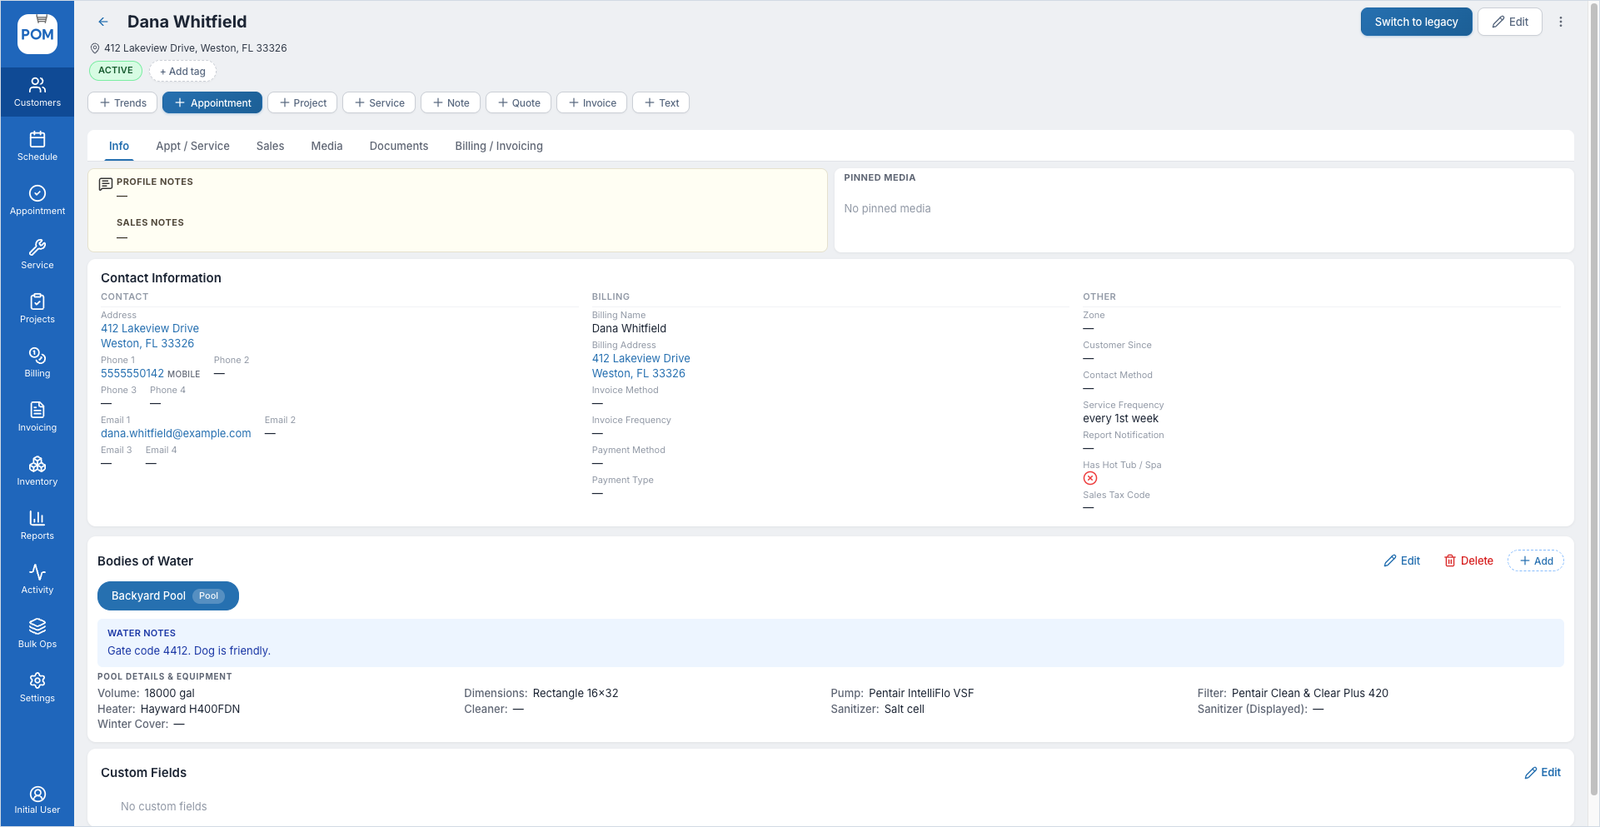
From here the action bar at the top of the profile does the rest: + Appointment puts the first visit on the schedule. That is the next article: Build your first schedule.
Connect QuickBooks Online
If you already run QuickBooks Online, do this before adding customers by hand so nothing gets entered twice.
- Click Settings in the left menu, then Apps under Integrations.
- Next to QuickBooks Online, click Install (1).
- Sign in to Intuit and choose your company. POM syncs customers, items and invoices in both directions.
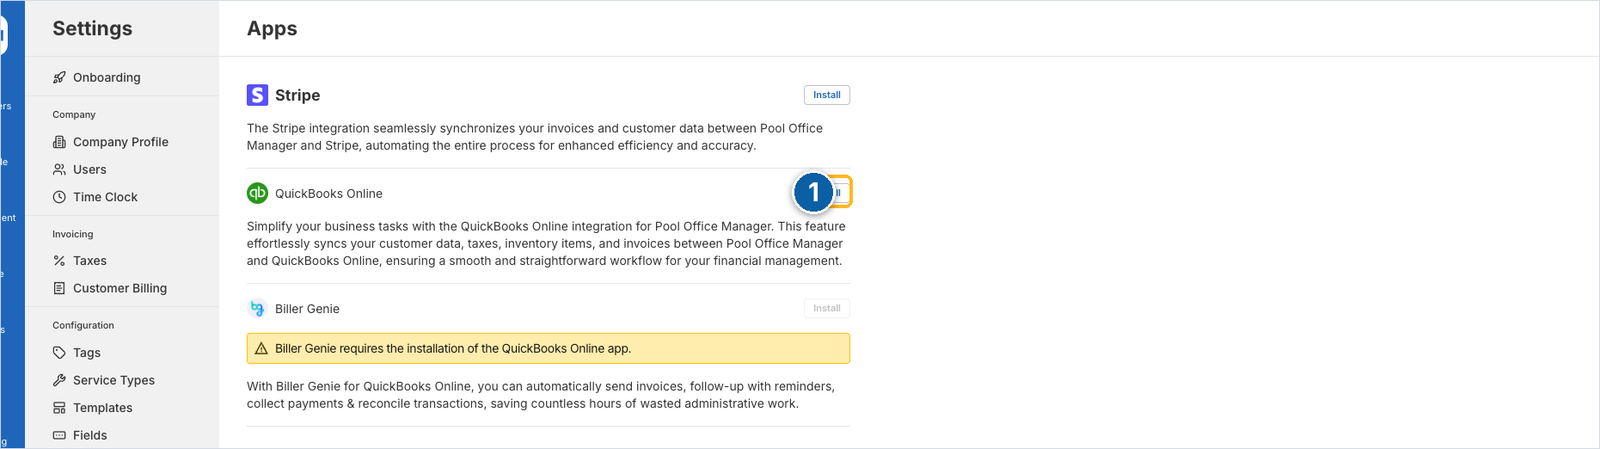
The sync begins immediately; your customers appear under Customers as it runs. Open one and add the body of water details as above; QuickBooks does not store pool information.
Using QuickBooks Desktop? See QuickBooks Desktop: Data Import.
Next steps
- Build your first schedule (next in this series)
- Set up the tech app on a phone
- Import your customer list if you have a spreadsheet
Need a hand? Call 614-710-0074 or email help@poolofficemanager.com. On the phone we can add your first customer with you in about five minutes.